Page 10 - Raritan Smart Toilet Control Bluetooth Owners Manual L381v0420
P. 10

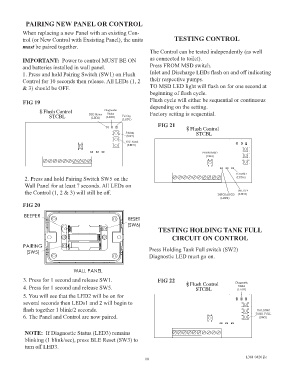
PAIRING NEW PANEL OR CONTROL

          When replacing a new Panel with an existing Con-
          trol (or New Control with Exsisting Panel), the units           TESTING CONTROL
          must be paired together.
                                                                The Control can be tested independently (as well

          IMPORTANT:  Power to control MUST BE ON               as connected to toilet).
          and batteries installed in wall panel.                Press FROM MSD switch.
          1. Press and hold Pairing Switch (SW1) on Flush       Inlet and Discharge LEDs flash on and off indicating
          Control for 10 seconds then release. All LEDs (1, 2   their respective pumps.
          & 3) should be OFF.                                   TO MSD LED light will flash on for one second at
                                                                beginning of flush cycle.

           FIG 19                                               Flush cycle will either be sequential or continuous
                                                                depending on the setting.
                                             Diagnostic
                   Flush Control      BLE Status              DIAGNOSTIC   Factory setting is sequential.
                                              Status
                                              STATUS
                                       BLE STATUS
                                                    Pairing
                      STCBL              (LED2)  (LED3)  PAIRING
                                              (LED3)
                                        (LED2)
                                                    (LED1)
                                                     (LED1)
                                                                   FIG 21
                                                                         Flush Control             DIAGNOSTIC  DIAGNOSTIC
                                                                                Flush Control
                                                                                                           STATUS
                                                      Pairing               STCBL STCBL      BLE STATUS  STATUS  PAIRING
                                                                                                    BLE STATUS
                                                      PAIRING
                                                                                                    (LED3)
                                                                                                           (LED3)
                                                       (SW1)                                  (LED2)  (LED2)  (LED1)  PAIRING
                                                      (SW1)
                                                                                                                  (LED1)
                                                      BLE Reset
                                                      BLE RESET
                                                        (LED1)
                                                       (SW3)
                                                                                                            PAIRING  PAIRING
                                                                                      FROM MSD               (SW1)  (SW1)
                                                                                           (SW4)
                                                                                                            BLE RESET  BLE RESET
                                                                                                             (SW3)  (SW3)
                                                                                                    TO MSD
           2. Press and hold Pairing Switch SW5 on the                                               (LED6)
           Wall Panel for at least 7 seconds. All LEDs on
           the Control (1, 2 & 3) will still be off.                                        DISCHARGE+  (LED5)
                                                                                                    INLET+
                                                                                                (LED4)
           FIG 20
           BEEPER
                                                      RESET
                                                      (SW6)
                                                                   TESTING HOLDING TANK FULL
                                                                         CIRCUIT ON CONTROL
           PAIRING                                             Press Holding Tank Full switch (SW2)
            (SW5)
                                                               Diagnostic LED must go on.
                                WALL PANEL
           3. Press for 1 second and release SW1.                  FIG 22                          Diagnostic
                                                                                Flush Control
           4. Press for 1 second and release SW5.                        Flush Control       BLE STATUS  DIAGNOSTIC  DIAGNOSTIC   PAIRING
                                                                                                     Status
                                                                                                    STATUS
                                                                                                           STATUS
                                                                                                    BLE STATUS
                                                                            STCBL STCBL
                                                                                                    (LED3)
                                                                                                    (LED3)
                                                                                                          PAIRING
                                                                                              (LED2)
                                                                                                           (LED3)
                                                                                                     (LED2)
           5. You will see that the LED2 will be on for                                                    (LED1)  (LED1)
           several seconds then LEDs1 and 2 will begin to                                                   PAIRING
           flash together 1 blink/2 seconds.                                                                  HOLDING   PAIRING
                                                                                                            (SW1)
                                                                                                                    (SW1)
                                                                                                            TANK FULL
           6. The Panel and Control are now paired.                                                         BLE RESET  BLE RESET
                                                                                                                 (SW2)
                                                                                                             (SW3)
                                                                                                                    (SW3)
           NOTE:  If Diagnostic Status (LED3) remains
           blinking (1 blink/sec), press BLE Reset (SW3) to
           turn off LED3.
                                                                                                        L381 0420 jlc
                                                                10
   5   6   7   8   9   10   11   12