
Page 6 - Raritan SeaEra Owners Manual L318v1215
P. 6
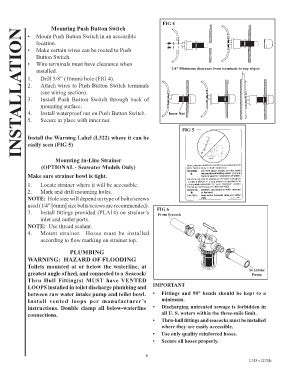
FIG 4
          INSTALLATION
                      Mounting Push Button Switch
             •  Mount Push Button Switch in an accessible
                location.
             •  Make certain wires can be routed to Push
                Button Switch.
             •  Wire terminals must have clearance when
                installed.                                               1/4” Minimum clearance from terminals to any object
             1.   Drill 5/8” (16mm) hole (FIG 4).
             2.   Attach wires to Push Button Switch terminals
                  (see wiring section).
             3.   Install Push Button Switch through back of
                  mounting surface.
             4.   Install waterproof nut on Push Button Switch.        Inner Nut
             5.   Secure in place with inner nut.

                                                                             FIG 5
             Install the Warning Label (L322) where it can be
             easily seen (FIG 5)


                        Mounting In-Line Strainer
                  (OPTIONAL - Seawater Models Only)

             Make sure strainer bowl is tight.
             1.   Locate strainer where it will be accessible.
             2.   Mark and drill mounting holes.
             NOTE:  Hole size will depend on type of bolts/screws
             used (1/4” [6mm] size bolts/screws are recommended).
             3.   Install fittings provided (PLA14) on strainer’s   FIG 6
                                                                   From Seacock
                  inlet and outlet ports.
             NOTE:  Use thread sealant.
             4.   Mount  strainer.    Hoses  must  be  installed
                  according to flow marking on strainer top.
                              PLUMBING
             WARNING:  HAZARD OF FLOODING
             Toilets mounted at or below the waterline, at
             greatest angle of heel, and connected to a  Seacock/                                        To Intake
                                                                                                          Pump
             Thru  Hull  Fitting(s)  MUST  have  VENTED
             LOOPS installed in toilet discharge plumbing and    IMPORTANT
             between raw water intake pump and toilet bowl.      •   Fittings and 90° bends should be kept to a
             Install  vented  loops  per  manufacturer’s             minimum.
             instructions. Double clamp all below-waterline      •   Discharging untreated sewage is forbidden in
             connections.                                            all U. S. waters within the three-mile limit.
                                                                 •   Thru-hull fittings and seacocks must be installed
                                                                     where they are easily accessible.
                                                                 •   Use only quality reinforced hoses.
                                                                 •   Secure all hoses properly.


                                                              6
                                                                                                         L318 v1215jlc